
我们知道所有程序的主入口是main函数, 这个概念在C语言里面的实现简单而直接.
1
2
3
4
int main(int argc, char **argv) {
    printf("hello world\n");
    return 0;
}
对于一个与用户交互的应用程序, 初始化之后通常会构造交互界面(比如CLI会接受用户输入), 然后进入事件循环处理各种用户事件, 系统事件, 伪代码如下.
1
2
3
4
5
6
7
int main(int argc, char **argv) {
    printf("hello world\n");
    while (event) {
        // do process
    }
    return 0
}
iOS应用程序 - 无论是基于Objective-C, 还是基于SwiftUI, 尽管实现方式不同, 模式都是相通的, 主入口提供功能: 初始化, 构造主界面, 进入事件循环.
1. Objective-C
基于Objective-C的应用程序
基于Objective-C的应用程序保持了C语言简单直接的风格, 应用程序创建后Xcode会自动生成main.m文件和main函数作为程序入口.
1
2
3
4
5
6
7
8
9
10
11
12
#import <UIKit/UIKit.h>
#import "AppDelegate.h"

int main(int argc, char * argv[]) {
    NSString * appDelegateClassName;
    @autoreleasepool {
        // Setup code that might create autoreleased objects goes here.
        appDelegateClassName = NSStringFromClass([AppDelegate class]);
    }
    return UIApplicationMain(argc, argv, nil, appDelegateClassName);
}
程序会在UIApplicationMain中进行初始化, 构造UI, 进入Runloop处理用户交互与系统事件, 直到调用exit()退出程序或者异常终止.
1.1 初始化
与main.m文件同时生成的还有AppDelegate.m, 通常在didFinishLaunchingWithOptions中进行初始化操作.
1
2
3
4
5
6
7
8
9
@implementation AppDelegate

- (BOOL)application:(UIApplication *)application didFinishLaunchingWithOptions:(NSDictionary *)launchOptions {
    // Override point for customization after application launch.
    return YES;
}

@end
1.2 主界面

启动程序完成初始化操作之后, 就要构造应用程序的交互界面了, 在Objective-C中是靠配置文件利用反射来完成的.
- Target -> General -> Main Interface指定
Mainstoryboard - Main storyboard中指定
Custom Class为ViewController ViewController构造主界面
上述配置存储在Info.plist文件中, 程序启动后读取配置, 利用Objective-C的反射机制初始化ViewController实例, 完成主界面构造.
2. SwiftUI
基于SwiftUI的应用程序结构更简单, 但是初始化部分稍微有些隐晦, 不易发现.
基于SwiftUI的应用程序
2.1 入口与主界面
1
2
3
4
5
6
7
8
9
10
import SwiftUI

@main
struct SwiftUIMainEntryApp: App {
    var body: some Scene {
        WindowGroup {
            ContentView()
        }
    }
}
与Objective-C应用程序不同, 基于SwiftUI的应用程序直接呈现的是主界面的构造代码, 程序入口和初始化被简化隐藏了. 主入口被简化成了一个@main标签, 该标签要求实例提供一个全局静态main函数作为入口, 全局只能有一个标识为@main的实例.
1
public static func main()
2.2 自定义初始化
那么初始化操作该如何进行呢?答案是@UIApplicationDelegateAdaptor.
1
2
3
4
5
6
7
8
9
10
11
12
13
14
15
16
17
18
19
20
21
22
23
24
25
26
27
28
@main
struct SwiftUIMainEntryApp: App {
    // swiftlint:disable:next weak_delegate
    @UIApplicationDelegateAdaptor(AppDelegate.self) var appDelegate

    var body: some Scene {
        WindowGroup {
            appDelegate.createContentView()
        }
    }
}

class AppDelegate: NSObject, UIApplicationDelegate, UISceneDelegate {

    override init() {
        super.init()
    }

    func createContentView() -> some View {
        ContentView()
    }

    func application(_ application: UIApplication,
                     didFinishLaunchingWithOptions launchOptions: [UIApplication.LaunchOptionsKey: Any]? = nil) -> Bool {
        return true
    }
}
我们需要自定义一个实现UIApplicationDelegate协议的类进行初始化操作.
3. Simple MVVM application
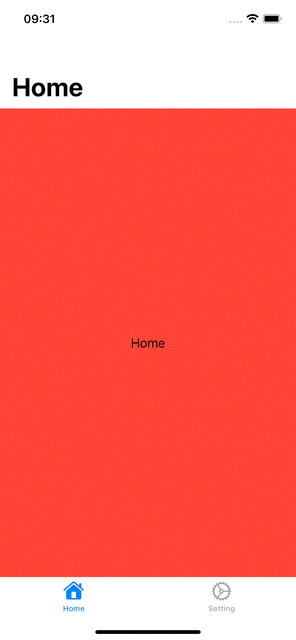
下面是一个简单的基于TabView的应用程序展示如何进行初始化以及创建主界面, 样式如下.
3.1 View and View Model
由于没有涉及到与外部的数据交互, 因此这里只有view和view model, 并没有MVVM中的第一个M: model.
view model
1
2
3
4
5
6
7
8
9
10
11
12
13
14
15
16
17
18
19
20
21
22
class RootViewModel: ObservableObject {
    @Published var tabList: [RootViewModelItem]
    var selected: TabType = .home

    init() {
        tabList = [
            .init(id: .home, title: "Home", image: Image(systemName: "house"), backgroundColor: .red),
            .init(id: .setting, title: "Setting", image: Image(systemName: "gear"), backgroundColor: .blue)
            ]
    }
}
enum TabType: Int, Hashable {
    case home, setting
}

struct RootViewModelItem: Identifiable {
    var id: TabType
    var title: LocalizedStringKey
    var image: Image
    var backgroundColor: Color
}
view
1
2
3
4
5
6
7
8
9
10
11
12
13
14
15
16
17
18
19
20
21
22
23
24
25
struct RootView: View {
    @ObservedObject var viewModel: RootViewModel

    var body: some View {
        TabView(selection: $viewModel.selected) {
            ForEach (viewModel.tabList) { item in
                tabView(item)
                    .tabItem {
                        item.image
                        Text(item.title)
                }
            }
        }
    }

    func tabView(_ item: RootViewModelItem) -> some View {
        NavigationView {
            ZStack {
                item.backgroundColor
                Text(item.title)
            }.navigationTitle(item.title)
        }
    }
}
3.2 初始化与主界面构造
入口与初始化
1
2
3
4
5
6
7
8
9
10
11
12
@main
struct SimpleApp: App {

    @UIApplicationDelegateAdaptor var appDelegate: AppDelegate

    var body: some Scene {
        WindowGroup {
            appDelegate.createRootView()
        }
    }
}
主界面构造
1
2
3
4
5
6
7
8
9
10
11
12
class AppDelegate: NSObject, UIApplicationDelegate {
    private let rootViewModel: RootViewModel

    override init() {
        rootViewModel = RootViewModel()
    }

    func createRootView() -> some View {
        return RootView(viewModel: rootViewModel)
    }
}